Sunday, January 9, 2011

My daughters craft blog { and a free blog background }

My 6 year old daughter has a craft blog now!
She had been asking me to take pictures of all her crafts and creations for a while now. She even asked me to take photos of her making things "so other kids can learn how to make them too".  She kept telling me not to put it on my blog but on her blog since they were her crafts. But her blogs name and URL had nothing to do with crafting. So I made her a new one! It's called One creative kid.
I designed the header, the background, and other icons myself. I played a lot with bright and vibrant colors, something I don't really do on my blog. It was so much fun!  My daughter asked me to put humming birds on the header so she gets credit for that. It would have been so boring without those. Here is the image to make your own gingham blog background. And who doesn't LOVE gingham right?
(Right click image to save)
 Here is how to put it onto a Blogger blog.
First you go to the Design tab in blogger and click "Template Designer".


Now click "Background"

Click the arrow or "remove image" to open the menu.

Next click "upload Image".


Click "Browse" and choose the image you want.


After loading your image, click "Tile" to view the menu.

Click "Tile" in the menu.

And last click "APPLY TO BLOG"
 You're done!
 Now go take a look at your awesome blog!
 Here are some more free blog backgrounds, they're smaller, and in different colors and angles. You can use these for desktop wallpaper too!  Happy gingham blogging everyone!
(Right click images to save.)

Thursday, January 6, 2011

Tutorial: masking tape flag cupcake topper


Hi there! Today I am sharing a really great craft to do with kids, masking tape cupcake flags! We all had a blast making them; my daughter made a valentine flag & I made a striped one. I think hers is better. :) This has to be the easiest craft tutorial I have posted so far. These are super cheap too!  Keep reading for a step by step how to.

  1.  Materials: masking tape, sucker sticks, permanent marker, and scissors.
  2. Put tape onto the stick and cut a V shape.
  3. Decorate with permanent marker.
  4. Make more!
 & that's it!  You're done! Super easy!
 My 6 year old daughter has been asking about putting up Valentines stuff ever since Christmas afternoon. So we took down Christmas yesterday. :( This is early for us to put away our Christmas stuff. Usually we leave up our main tree and decorate the dining room tree with Valentines.  My husband and I sang and played Christmas songs on the stereo while we put everything away. I am still making Christmas crafts though. I am making a little glitter village.
I am excited about the future and happy to see my walls again even if they feel a bit naked.  I have a Valentine tree up in my living room and I'll have to post photos of that soon. :)  We're always celebrating something at our house. :)

Sunday, January 2, 2011

Gift: "Harry Potter" doll and accessories

About a week before Christmas I finally got the light bulb over my head for the PERFECT gift for my daughter. A Harry Potter doll!  Not Harry himself but a girl who goes to Hogwarts and has little accessories. I love doll accessories, something about how tiny they are is just so irresistible. In fact I think I love the accessories more than dolls....maybe.

One of my favorite things I made is the feather quill pen. I took a chicken feather and cut it down to the size for a doll. So cute! I had my husband help me carve a twig into a wand and I used a bead for the sorcerers stone. Later, after Christmas, it was my daughters idea to cut out little HP fan posters for the doll from a magazine. The backpack and text books are a Christmas gift from my sister when we were younger. (Pictured with the doll, later in this post, is a broom I made from a stick and straw.)
 As a girl I loved looking through the America Girl doll catalogs, loving all the accessories they had.  I never did like the American Girl dolls themselves though, I don't really like their face sculpt to be specific. I looked all over on line and found some other lovely dolls but was worried they wouldn't ship in time for Christmas. Then I realized that up in the attic packed away were my Magic Attic dolls from when I was younger.
It was meant to be. I immediately went upstairs, got the doll that looked most like my daughter and went to work.

She turned out so perfect! I knitted the Gryffindor scarf, sewed the robes out of felt, and made her plaid skirt. (Her socks, shoes and shirt were doll clothes I already had.)  I sewed and sewed while watching an old season of Project Runway. Since I had a Christmas Eve deadline it kind of  felt like I was on the show too. I wonder what Tim Gunn would say? I ended up losing a knitting needle in the middle of working on the scarf and I guess Tim would have said "make it work" so I did and used a needle that was one size too small to finish the the rest of the scarf. :)

 
A tiny little felt shield adorns the lapel of the robe with an embroidered H for Hogwarts. (Any true HP fan will notice her costume is not exactly movie accurate but I was on a time limit and used no references. Plus my daughter has not yet pointed anything out that is incorrect and that is pretty awesome since she is always happy to correct me when it comes to HP. ) 
This gift was so rewarding to make, and it was so fun to watch it be received with joy and love.  She is fascinated and I am so excited to play dolls along with her. Hope you too had a great time creating the perfect gift this Christmas :)

Wednesday, December 29, 2010

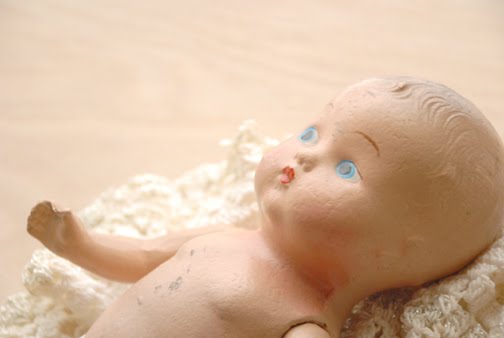
antique babies

Every year my husband Trent has a Christmas gift theme. Last year was "cooking" and he got me recipe books and cooking gadgets. This years' theme was "vintage".
He got me two beautiful antique dolls.
The small one is from the 1930's (?) and the bigger one is from the 1920's.

About a week before Christmas I got on Etsy to look for a vintage doll for my daughter and found some of the most beautiful composition baby dolls. I was about to buy this one for myself. ( I still might.) Trent noticed me swooning and sighing whenever I saw one. He convinced me not to buy any of them though.  He later sneaked out to the local antique store and bought these two lovelies for me, and I remained clueless the whole time ;) Both my dolls are made out of composition, which is super awesome. 
The bigger one cries when you lean it forward and closes it's eyes when you lean it back. All this time when I would look at this exact doll at the antique store I never picked it up, and on Christmas morning when I leaned it forward I almost died from adorable overload when it cried out!  I can't believe it's mine!
They're soooo sweet and I love them so much. Thanks honey!

Monday, December 27, 2010

Lion for the birthday boy

 Hi everyone I hope you all had a great Christmas!! I am excited to share a little doll I crocheted for my sons first birthday.
I always make a doll for my kids for their first birthday.  I made the lion mint green to go along with his mint party theme and I love how he turned out!  I especially love the felt heart. :)

Friday, December 17, 2010

A mint themed birthday party

My baby boy turned one Tuesday, so we threw him a little party.  My inspiration was a little red and white striped outfit I have been wanting to make for some time. I wanted him to wear it for his birthday pictures and the party stemmed from that into a mint theme. Green mint frosting and red and white striped peppermint decorations. We made the party hats way last minuet and they ended up adding so much to the party.

Monday, December 13, 2010

Glittered felt Trees Featured on Felt-o-rama

My glittered felt Christmas trees are being featured over at Felt-o-rama today! :)
Felt-o-rama is such a great place to be inspired and find great projects to make with felt. And not only that but they sell felt too! (You all might have already known this but I first discovered the blog and then later realized they also sold felt.)  Not to long after posting my felt flower tutorial I noticed a lot of traffic on my blog coming from there. I went to the site and discovered a humongous list in the side bar full of amazing crafts to make with felt!  Mine was in the list of different felt flowers. There are so many great ideas over there, you definitely have to check it out!