Showing posts with label pretty packaging. Show all posts

Thursday, December 1, 2011

Featured on : elleadore.com

 I am happy to let you all know about a french online magazine called Elle Adore that featured my packaging today! I am flattered to have my packages showcased with so many other beautiful and creative ones.
To go to the other pages of the article and see the images larger, just click the button at the bottom right of the article that says "Suivant".

Saturday, November 26, 2011

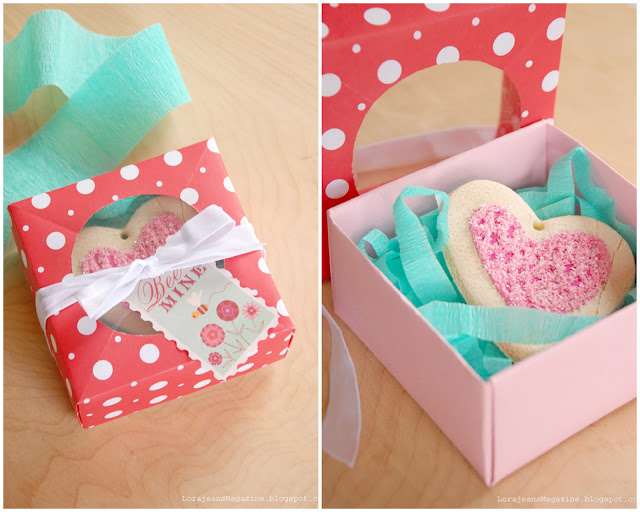
saltdough cookie ornament in origami box

 Just wanted to post a link to my salt dough cookie ornament recipe for those who don't already know about it yet. These are sill some of my most favorite ornaments. And don't forget the origami box with a window to put them in.

Tuesday, May 3, 2011

Boxed lunch picnic party!!

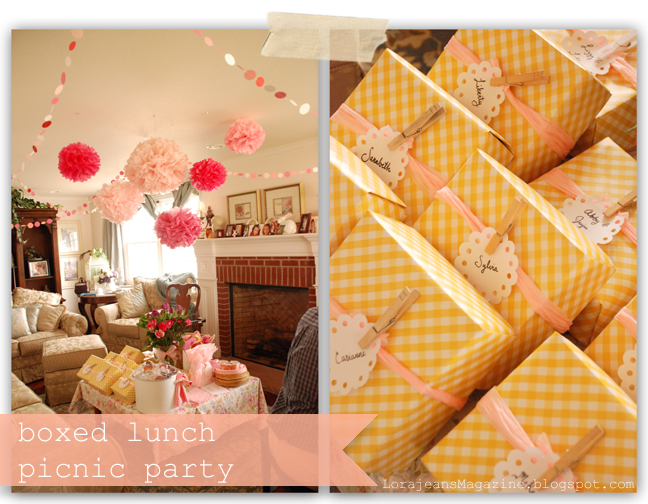
 Ever since we decided to visit CO for Easter I knew I wanted to throw my big sister a surprise baby shower. I spent months dreaming up ideas, I really wanted it to be perfect. She is my oldest sister and has always been a role model of mine. :) As a girl whenever I felt crumby she was always there to pick me up and say something nice and encouraging to me. Seriously, I owe much of my self confidence to her! Love you D-llyn!   Since she is expecting her fifth child I felt she needed a huge party! But instead of the traditional baby shower I wanted to celebrate her, so I decided to call it a mommy shower! I was really wanting to do a picnic party on the grass but it was FREEZING that day so we did it inside. :) I think it turned out so pretty, maybe even better than if it had been outside. 
The decorations were a collection of the prettiest pink pom poms ever and the cutest confetti garland. My sister Annie Carie made the pom poms using Martha's method, and made the confetti garland by punching circles out of card stock and sewing them together. They really made it feel like a party. We loved them so much we left them up till Easter, and might be there still. :) Since I love origami boxes I knew I had to incorporate them into the party some how. When I was brainstorming with  Annie Carie, & she mentioned doing boxed lunches, I just about screamed! Origami boxed lunches, it was meant to be! And I had just the right wallpaper for the job too, yellow gingham! I decorated each box with a tissue paper sash that was held closed with a clothes pin, and the name tags were made using my easy DIY doily instructions.
First we all yelled "Surprise!", then we sat down to eat our boxed lunches.  Each of the boxes was stuffed full of these goodies: a ham sandwich, an orange, a strawberry cupcake, & 2  powdered sugar doughnuts. So Yummy!! Next we played a candy guessing game. It was full of fun and laughter. I was terrible at guessing but somehow got candy anyway. ;)

Because the yellow and pink color scheme reminded me of pink lemonade, that's what I planned to drink. All they had at the store was kiwi strawberry, still yummy though. I used my moms cute white pot to put the drinks on ice. Isn't it the best? I want one just like it!  We had such a fun time! 
Hope you had a great Easter I'll post photos of ours soon, my mom always makes the best table-scapes. Thanks for stopping by.

Wednesday, April 13, 2011

Tutorial: ruffled crepe paper streamers


  Hello everyone! I am so excited for today's post! :) I want to welcome all the readers coming over from See Kate Sew. Please stay a while and look around. :)
If you haven't ever been to Kate's blog go and check it out!!  She prints her own fabric, made the coolest clutch from a vintage book, and I am thrilled to be a part of her Ruffle Event! Check it out, for three whole weeks there will be guest posts, inspirations, and giveaways all about ruffles! :)

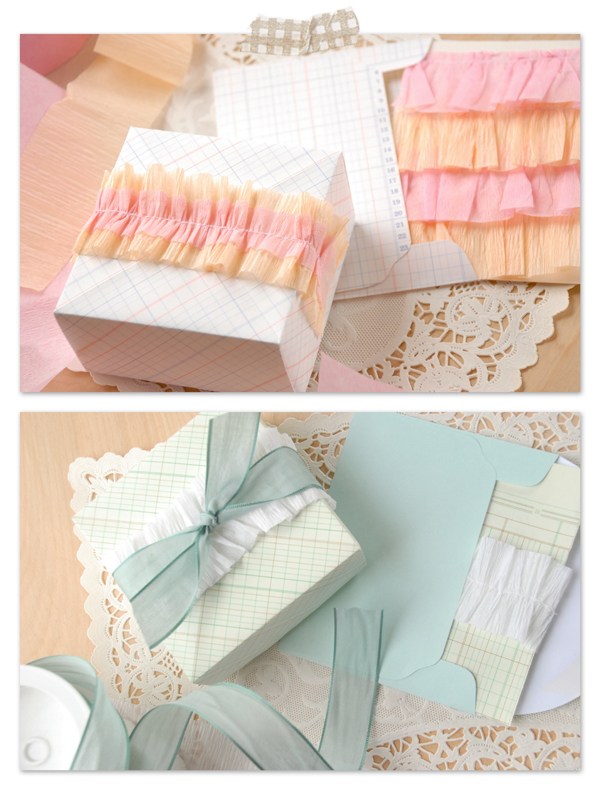
For my ruffle post I am showing you how to ruffle crepe paper streamers. I am using my ruffles to decorate origami boxes, but you can do anything you want with yours! The possibilities are endless!

 Lets start ruffling! :)

Materials :
  • Crepe paper streamers
  • sewing machine (or needle and thread)
1. The first thing you need to do is sew a straight stitch down the middle (or side depending on what kind of ruffle you want). If you want two layers sew through two streamers at the same time.
In making ruffles of any kind you Do NOT back stitch, the threads need to be loose and pull-able.
2. Next, tie a knot in the threads at one end.  This enables you to pull freely without the worry of pulling the thread completely out. (Something I did so many times it's not even funny, thus the creation of this step).

 3. Now pull one of the threads at the end that that has no knot. You can gather the ruffle loose or really full whatever you want! :)
4. Once you have the ruffle to the desired fullness, tie a knot at the other end (the end with no knot) and trim the excess threads. 
5. (optional)  If you want to you can sew on top of your ruffle after you have gathered it to keep it from sliding around on the thread. (I was impatient and ready to move on, so I opted out on this step for some of my ruffles).

You're done!

Now is the fun part where you get to figure out what to do with your ruffles! :)  I had been itching to make origami boxes again so I did. :) While at the thrift store a while back, I found a huge old ledger book full of ledger paper, I tried using it for origami and I am smitten!  It is just the right weight and looks so pretty all folded up! :) I used the ruffles to decorate the boxes and since ruffles are so textured you really don't need anything else on the package. 
  I was having so much fun so I did two color schemes; sherbet (above), and blues (below).
I was going crazy making ruffles so I sewed some to card-stock and made a matching card. I also made the envelope out of the ledger paper by tracing another envelope.

For this package I added a pretty blue ribbon on top of the white ruffle to give it an extra pop.  I also used ledger paper to make a simple ruffled card.


Thanks for stopping by! :)

Tuesday, January 25, 2011

Tutorial : How to make a window in your origami box

Remember when I figured out how to cut a hole in the top of my origami boxes? Ever since then I have been wanting to make a video. Well I finally did!

I have a tripod now so the video isn't as wobbly as my other video so thats nice. I don't teach how to make the box itself in this video so to learn how to make the box go here. I made some as gift boxes for Christmas presents for my nieces. I put little recycled Rosette hair clips inside them. It was because of the window that they turned out so adorable I think! I am so excited to share this with you all! Lets get onto the video!


Tuesday, January 11, 2011

Valentine salt dough cookies

I thought it would be fun to re-share the salt dough cookies I made last year. They are so festive and pretty! These are really easy to make, just use the same recipe as the snowflake cookies, but omit the food coloring so they look like sugar cookies! I also didn't add glitter to some of them and I like how they turned out. What do you think?. I glued ribbon loops to the back of some and gave them as a gift to my friend to put on her valentine tree. She loved it. :)


I tried some new techniques when I made the cookie below.  First I painted a red heart with craft paint. Then I decorated on top of the red paint with white puff paint and glittered the wet puff paint. It ended up looking awesome!
 

 I have them hanging on my Valentines tree and they look really cute! 
(P.S. The glitter cupid cost me 25 cents at an after Christmas sale! I also got my pink ball ornaments after Christmas at Walmart. A box of 25 ornaments for $3, you can't beat that!)

These look so pretty all packaged up in a pink origami box made from 12x12 pieces of card stock.
If you haven't tried to make these yet go and try it. They are so fun and addictive!

If you don't have mountains of 12x12 scrapbook paper you can cut two 12x12 pieces out of any paper grocery bag. :)  Like the one pictured below. This is a very cost effective and earth friendly form of packaging. :)
You might have noticed that these boxes have shallow lids. I usually make lids that totally cover the bottom box. It was kind of hard to figure out.  Once I have it simplified I'll give a tutorial on that. :) 

Friday, December 10, 2010

Tutorilal: How to make christmas salt dough "cookie" ornaments

Hello and Happy Friday! With all my other projects going on with blogging, home school, Christmas presents, and sculptures I am so happy to have this tutorial checked off and done!  It is such a great craft because it costs next to nothing and is so classic and pretty.  I am a firm believer that one can never have too many ornaments. And that is probably why I have three Christmas trees up in my house. Not counting any trees smaller than three feet. If I count those then I have seven trees in my house. But we're getting off the subject, so on to the tutorial. :)
  These ornament "cookies" are super easy to make.
_____________________________________
You need:
  • salt
  • flour
  • water
  • cookie cutters
  • rolling pin
  • oven
  • parchment paper
  • clear glitter
  • puff paint
___________________________________
Combine 
1 cup salt
1 cup flour
(Seriously, that's it! Super easy to remember, too.) 
_____________________________________
Add Water
Just enough water to get the consistency of play dough; too much water makes it really difficult to roll and cut into shapes.
(I chilled my dough in the fridge to get it to roll better, but I probably could have added more flour and salt)
_____________________________________
Color
Add food coloring to get a gingerbread look.
I experimented till it turned a nice golden brown, but here is a guideline.
 10 drops of yellow
8 drops of red 
3 drops of green

(Optional: I added cinnamon & ginger mainly for smell, but the cinnamon does add a bit of color, too...I added at least a tablespoon of each, but the ornaments don't smell anymore, so I'll try adding more next time).

I added a lot of color to mine but they ended up darker after baking.  I think mine look a little more like chocolate cookies than gingerbread, but that also could be because I added blue and a little too much red...so, try out the recipe above, and change as you see fit.

_____________________________________
Roll Dough...
1/4 - 3/8 inches thick and cut out shapes on a well-floured surface.
(I rolled a few of mine too thin, and those cookies ended up pretty fragile.)
_______________________________________
Make the hole...
 in the top of each ornament using a straw.
(I found this surprisingly entertaining. The kids loved helping with this as well.)
_______________________________________
Bake
Preheat oven to 250
Place cookies on a cookie sheet lined with parchment paper.
Bake cookies for three hours. Or till cookies are super hard, poke with a fork really hard and if they give they're not done.
(I know it is a long time but if they aren't fully cooked they end up fragile and crumbly. Some of my fave salt dough ornaments are lost due to under-cooking.)
__________________________________________
Cool
These babies are HOT so let them cool before decorating.
__________________________________________
Decorate
Frost each "cookie" using puff paint.
(I used white because I made snowflakes, but you can get creative. I used Tulip brand just fyi)

 ________________________________________
Sprinkle...
 generously with glitter.
(I used a rough cut glitter that looked as much like sugar as I could find.)
Shake off any excess glitter.
__________________________________________
Dry...
in a safe place away from kids who might think these are real cookies :)
( No this is not from personal experience but my kids did ask if they could have one. Good thing I had real gingerbread cookies on hand to give them.)
__________________________________________
Hang,
with a string or an ornament hook on your tree. 
(You could also hang them in the window or use them as a decoration on a gift package.)
_______________________________________
Give
Since I made a double batch I have tons of extras to give as gifts.  
My double batch made about two dozen cookie ornaments, so this recipe should make one dozen.
 (I figured out a really easy way to make a cute little window in my origami boxes! Super awesome right?!! If I have time I'll make a tutorial on that.)

So go ahead and try it out! Tell me what you think. If you have any questions please don't hesitate to contact me. :) 
Oh and my new sculpture is up in the shop now.

Thursday, December 2, 2010

Made by you: origami boxes

 I love seeing the things you make from my tutorials!
You are all so creative!! Getting your pretty photos in my in-box is so fun!!
 Alexandra, from Switzerland, made this pretty box using recycled newspaper. I love that she chose a blue page and made matching decorations. :)

My sister, Annie Carie , made these from holiday card-stock. I love how festive and colorful they are.

Janelle, from New Zealand, made these boxes from paper she printed from her computer. I love the retro designs!
Have you made an origami box, a felt flower, or any one of my tutorials?  Please email me your photos, I would love to share them with everyone! :)

Tuesday, November 30, 2010

How to make a doily

The images are pretty self explanatory but here are the steps.
  1. Trace a circle using a cup.
  2. Use large scalloped scissors to cut around the circle.
  3. Use a hole punch to punch a hole in each scallop.
  4. Punch another row above and in between the other holes.
  5. Erase circle or flip it over.
And done! 
boxes
You can use this same technique in a straight line to make a lace strip like I did for the package on the left.

Wednesday, November 17, 2010

Tis the season...

...for glittered felt Christmas trees. I love these trees so much. I made them last year and they were very affordable to make. They turned out so pretty and magical I plan on giving you a tutorial soon so stay tuned. :) 

Also, check out these adorable origami boxes my sister Merrilee made using my tutorial. :)
  She made them for Halloween and put pumpkin cream pies inside, yum! (Ooh what if for Christmas you made gingerbread cream pies, or chocolate with pepermint cream and added crushed candy canes yummmm!)
I was checking out my stats and she has sent quite a few readers over to my blog ever since she linked to my origami boxes and I wanted to share the love and send all of you over to her blog; Mer Mag. So head on over and prepare to be inspired by her loveliness!

this post is participating in these link parties

Wednesday, October 13, 2010

Favorite gifts to give and get

Hi everyone! I was asked by Amberlee to participate in a post about my favorite gifts on Giverslog. If you haven't been to her blog yet get on over there. It is a great place to get inspiration on gift giving, pretty wrapping, or to just look at all the eye candy she posts!
origami boxes
 These boxes are made from re-purposed paper grocery bags and 12x12 scrapbook paper.  If you want to learn how to make one just watch my origami box tutorial video here.


What is my favorite gift to give or receive? I have to say hands down it's a handmade gift!  A handmade gift says, I am willing to spend the time, whether it's time wrapping it beautifully, time planing out what the gift is, or time making the gift itself.  My most recent favorite gift to receive was a skull and crossbones blanket my mother made for my son.  I love it because my son is obsessed with skeletons, & I love it because my mom went outside her own craft style just for him. (She's not the scull and crossbones type at all.) :) I also love it because every night when I tuck him in, he is reminded his grandma loves him.
Thanks mom!

 One tradition that I do is I make a plush food toy for each of my kids every year for Christmas. As a kid I loved to play store or pretend cook. My kids are the same. My daughter loves pretend cooking. At three years old she professed the desire to be a chef, now at 6 years old she still plays with the food toys I make. Throughout the years here is some of what I have made, a 3 layered cake, brownies, chocolate cookies, pizza, spaghetti, and a popsicle. (I may be forgetting some.)

Pictured  below are the food toys I made last year.gifts

Wrapping the gift, for me, is just as fun as making it. A wile ago I fell in love with the cute packaging I was seeing at the craft stores.  But I was unwilling to buy them, I was bent on figuring out some way to do it myself!  And I guess I finally did. This simple origami box has changed my take on wrapping and gift giving. I am obsessed! (Yesterday I even tried to make one out of a 3x3 ft piece of canvas... it didn't work.)
Pictured at the very top are of some of the first origami boxes I made. 
 Here is what I love about giving handmade gifts:
  • planning 
  • creating
  • wrapping
  • scheming
  • sneaking around
  • surprising
  • creating a gift that matches their personality
  • creating a keepsake or heirloom gift
  • giving something totally unique

     Here is what I love about receiving handmade gifts:

    •  the flaws of a child's handmade gift
    • remembering the giver when looking at the gift
    • the fact the no one else has one like it
    •  the time & effort they spent on it
    What was your favorite gift to give or get?
     
    I like to link up with these link parties.

    Friday, October 1, 2010

    Free Halloween Challenge Oct 1st-7th {free printable cupcake toppers}

    Here is my first post for the Free Halloween Challenge.  Today I am posting some free printable ghost cupcake toppers.

    ghost cupcake topper

    What a fun time I had making these cuties!
    Also here are some different ways these can be used:
    Print them on sticker paper for spooky ghost stickers.
    Punch holes in the top of each one and string up as a garland.
    Use scalloped scissors for added whimsy.
    Or attach to a cute little package.
     ghost package decoration 

    Terms of use: 
    for personal use, not for profit!
    Don't post large image on your blog,
    post a small one and link it back to me. :)
    Click on image to view larger and save.


      grab a button and share the wealth
      button blog

      Monday, September 27, 2010

      I can't get enough of these origami boxes

       Whenever I bake cookies or any yummy treat I go back to these boxes to package and give as gifts to friends and neighbors.  I also love to use them for favors and place settings for parties.  This one was made with 12x12 scrapbook paper.  Perfect size for cookies! :)
      Origami box


      Monday, August 16, 2010

      Origami box tutorial

      boxes

      Lately I have have had people ask me to post a tutorial on my wallpaper origami boxes so here it is. My 5 year old daughter taped it for me so excuse the shaky, and sometimes off to one side filming.
      I have another tutorial on how to make a pretty window in your origami box lid, go here to see it.


      You know how when you hear your own voice on video you sound so weird? Well I've noticed how low my voice sounds, and also how much I sound like my sisters and mom. Sounding like my family isn't bad at all, in fact it makes me happy. (Hi mom, hi 4 sisters, love & miss you guys!XoxOXOXOOooxoxo.)
      So let me know what you think! Do you have any questions? Did it make sense?

      Also, I thought it would be fun to have you all share the pretty origami boxes you make! Just email me an image and I might feature your pretty package in a blog post sometime! :)


      Friday, May 28, 2010

      a gift for my little sis

      sara's gift

      I have been on a beading kick lately and my little sister is turning fourteen in a few weeks, so I decided I needed to celebrate by making her some jewelry. I think I had as much fun packaging them as I did making them. (I can get away with posting the photos this soon because she is going to be on the road for a while and then romping around Disneyland! NOT FAIR!) :)


      close neclace
      close earings

      Saturday, April 3, 2010

      origami boxes with wallpaper?

      boxes
      No really, I folded these boxes out of old wallpaper I got at the thrift store! Want to make these too? Check out my tutorial video here.
      boxes
      Since I used the entire width of the roll these boxes ended up pretty big.
      I think they're about 8in x 8in.

      boxes
      I originally bought the wallpaper to be wrapping paper. I was staring at the roll wishing I had boxes to wrap and that's when I realized that the wallpaper was thick enough to make origami boxes! {Bonus! These wallpaper rolls come with way more paper than wrapping paper rolls do!}
      boxes
      I put little dividers inside to separate the chocolate nest treats I made for Easter. Maybe I'll put home made peeps in another box. You could use these boxes for cupcakes as well since they're tall enough. The possibilities are endless really.
      boxes
      As you can see from all the photos, I had a lot of fun decorating them too. I think I am in love with packaging and wrapping! (And, I'm more than a little obsessed with origami boxes!)
      boxes
      Happy Easter everyone!