Showing posts with label tutorials. Show all posts

Thursday, June 30, 2011

Another quilt top finished! { and a pattern of sorts }

Remember the bunting slash pendant quilt from these other posts? Well I finished piecing it! I am so happy with how it turned out!!
I chose a primary color theme and decided to do a mix of traditional and modern fabrics. I love that it is simple and each fabric is showcased by the white surrounding it.
Let me tell you a little about it in case you want to make one too.
  • Each triangle measures 5x8x8 in.
  • There are 96 colored triangles and 102 white muslin triangles.
  • Sew the 8 inch sides of the triangles together alternating between colored and white.
  •  Make 6 sections (or strips) of 17 white triangles and 16 colored ones. 
  • Each triangle section/strip begins and ends with a white triangle.
  • The 5 strips of muslin between the triangle sections are 9 in. x 70in.
  • The top and bottom strips of white muslin are 4.5 in. x 70in.
I'll be sure to share the finished product all bound and quilted! :)
I honestly can't believe I made a quilt by myself!! I always said that of all the crafts, quilting was the one I would never be able to do. But I figured it out pretty good I think. It really turned out better than I thought, I figured all the tips would get sewn into the seams but somehow they didn't!
I also remember saying once that quilting was a stupid craft because you take perfectly good pieces of fabric and cut them up just so you can put them back together again. Well, people change and I take it all back! Quilting ROCKS!!!!!! :) And I hope to keep making more and more!

On a  completely different note,  we found a baby robin that fell out of its nest today. 
 I heard it crying while I was outside taking photos of the quilt. It's so adorable an tiny! We fed it half a worm and them put it back in the nest. It seems the parents had no problem with us handling it and are taking care of it again. :)

Wednesday, April 13, 2011

Tutorial: ruffled crepe paper streamers


  Hello everyone! I am so excited for today's post! :) I want to welcome all the readers coming over from See Kate Sew. Please stay a while and look around. :)
If you haven't ever been to Kate's blog go and check it out!!  She prints her own fabric, made the coolest clutch from a vintage book, and I am thrilled to be a part of her Ruffle Event! Check it out, for three whole weeks there will be guest posts, inspirations, and giveaways all about ruffles! :)

For my ruffle post I am showing you how to ruffle crepe paper streamers. I am using my ruffles to decorate origami boxes, but you can do anything you want with yours! The possibilities are endless!

 Lets start ruffling! :)

Materials :
  • Crepe paper streamers
  • sewing machine (or needle and thread)
1. The first thing you need to do is sew a straight stitch down the middle (or side depending on what kind of ruffle you want). If you want two layers sew through two streamers at the same time.
In making ruffles of any kind you Do NOT back stitch, the threads need to be loose and pull-able.
2. Next, tie a knot in the threads at one end.  This enables you to pull freely without the worry of pulling the thread completely out. (Something I did so many times it's not even funny, thus the creation of this step).

 3. Now pull one of the threads at the end that that has no knot. You can gather the ruffle loose or really full whatever you want! :)
4. Once you have the ruffle to the desired fullness, tie a knot at the other end (the end with no knot) and trim the excess threads. 
5. (optional)  If you want to you can sew on top of your ruffle after you have gathered it to keep it from sliding around on the thread. (I was impatient and ready to move on, so I opted out on this step for some of my ruffles).

You're done!

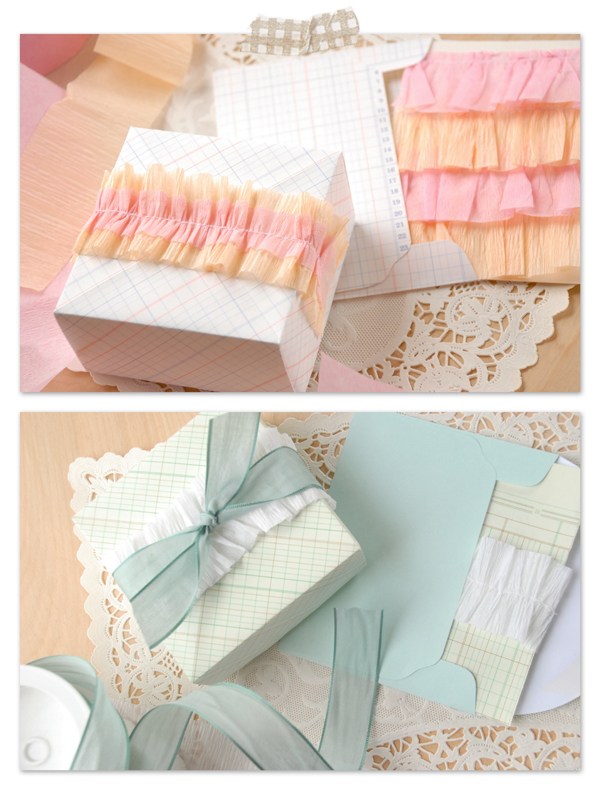
Now is the fun part where you get to figure out what to do with your ruffles! :)  I had been itching to make origami boxes again so I did. :) While at the thrift store a while back, I found a huge old ledger book full of ledger paper, I tried using it for origami and I am smitten!  It is just the right weight and looks so pretty all folded up! :) I used the ruffles to decorate the boxes and since ruffles are so textured you really don't need anything else on the package. 
  I was having so much fun so I did two color schemes; sherbet (above), and blues (below).
I was going crazy making ruffles so I sewed some to card-stock and made a matching card. I also made the envelope out of the ledger paper by tracing another envelope.

For this package I added a pretty blue ribbon on top of the white ruffle to give it an extra pop.  I also used ledger paper to make a simple ruffled card.


Thanks for stopping by! :)

Tuesday, April 5, 2011

Tutorial: How to make colorful yarn rope


 I have had a little hair braider for a while now, but only recently did I use it in crafting.  It is now one of my favorite craft tools! I have seen these come with four, three and two prongs. They are so easy to use. I found mine at the thrift store. I thought it would be fun to make a little tutorial for you.
 
-Materials-
  • Hair braiding tool
  • yarn
  • 1 safety pin
 
1. Start by cutting the same length of yarn in each color.2. Tie all yarns into a knot at one end.
3. Use the safety pin to pin the knot to a heavy object. (I used my heavy purse that holds all my scrapbook paper).
4. Next attach the other end of each yarn to the braid maker. You do this by pushing up on the back of each prong to open the metal hook. Put the yarn in the hook, then let the hook spring back down to hold the yarn in place.
5. Now, pull the yarn taught and push up on the button toward the #1. Do this for a long time to make the rope be tight and really twisted when it is finished. 
 NOTE: For this part you want the yarns to spin individually, NOT TWIST TOGETHER. If the yarn is twisting together run your fingers along while you spin so they don't twist.


6. Keep the yarn taught, and now push the button down toward the #2.  Do this for as long as it takes to get the rope to look the way you want.  
Note: If the yarn is twisting too much at one end, gently pinch the rope while you spin and guide the tighter part up to the other end till it is evenly twisted.

7. Lastly, pinch the part of the rope that is closest to the braid machine, take the yarn out of the machine, and tie a knot.
TA DA! YOUR DONE!

Wednesday, February 23, 2011

Tutorilal: How to crochet a baby gnome hat

I want to start by welcoming all the readers that have come over from Made, where this post is participating in "Celebrate the boy". 
Dana has giveaways and a wonderful collection of tutorials for making all kinds of cute boy stuff, so if you haven't already, go and check it out. A wonderful group of bloggers will be contributing tutorials. Not to mention the lovely tutorials Dana herself will be posting as well! It lasts all month, and into march a little too, so keep going back to see whats going on over there! :) 
I decided to share crochet instructions for a baby gnome hat!  If you want to read about my inspiration for the hat and what not, you can read it over on Made. :)
I only used one skein of "Charisma" by Loops and Threads, a bulky 5 weight acrylic yarn. I chose a thick yarn for warmth, and acrylic for wash-ability. This was my second time using this yarn, I am really happy with the way it turned out and will probably use it again in the future. It is really soft and doesn't itch like some acrylic yarns. I have made this hat using a lighter weight yarn and it works fine, the spaces between stitches are a little larger though.
Most of the hat is crocheted in the round and is worked almost entirely using the double crochet stitch. The pattern I am sharing is for a 12month old - 3 yr old size head.

The hook I used was US I 9 / 5.50mm.

Gauge
3 rows of 6 dc = 2in x 2in

Here is a key for all the abbreviations I use.
dc = double crochet
ch = chain
sl st = slip stitch
rep = repeat
sk = skip
beg = beginning
rnd = round

Lets get stared,

Ch 4, join with a sl st to form a ring.

Rnd 1: ch 2 for first dc, 8 dc in ring, sl st to top of beg ch. 
(9 stitches counting the ch 2.)

Rnd 2: ch 2 for first dc, dc in each dc, sl st to top of beg ch. 
(9 stitches counting the ch 2.)

Rnd 3: ch 2 for first dc, dc in 1 dc, *2 dc in 1 dc, dc in next 2 dc, rep from *, sl st to top of beg ch. 
(12 stitches counting the ch 2.)

Rnd 4: same as rnd 2.
(12 stitches counting the ch 2.)

Rnd 5: same as rnd 3.
(16 stitches counting the ch 2.)

Rnd 6: same as rnd 2.
(16 stitches counting the ch 2.)

Rnd 7: same as rnd 3.
(21 stitches counting the ch 2.)

Rnd 8: same as rnd 2.
(21stitches counting the ch 2.)

Rnd 9: same as rnd 3.
(28 stitches counting the ch 2.)

Rnd 10: same as rnd 2.
(28 stitches counting the ch 2.)

Rnd 11: same as rnd 3.
(37 stitches counting the ch 2.)

Rnd 12: same as rnd 2.
(37 stitches counting the ch 2.)

Rnd 13: same as rnd 3.
(49 stitches counting the ch 2.)

Rnd 14: same as rnd 2.
(49 stitches counting the ch 2.)

Rnd 15: same as rnd 2.
(49 stitches counting the ch 2.)

Rnd 16: same as rnd 2.
(49 stitches counting the ch 2.)

Rnd 17: same as rnd 2.
(49 stitches counting the ch 2.)

Rnd 18: same as rnd 2.
(49 stitches counting the ch 2.)

After round 18 is finished fasten off and thread extra yarn into the hat.
You should now have a cute little gnome hat with no ear flaps.  If you don't want ear flaps you can stop here and call it good. If you do want ear flaps keep reading. :)

If you look at your hat you will see a "seam" of stitches where you joined each round and started the next one.  Lay the hat flat so that The "seam" is in the middle to make counting stitches easier. (Like in the photo below.)
 To add the first ear flap; Start working in the 10th stitch from the "seam". (see top photo above) Work the first row of the flap with the wrong side (inside of the hat) facing you.

Ear flap row 1: ch 3 for 1st dc, (working to the right) sk 2 dc, sl st,
(working to the left now) 7 dc (8 stitches total counting ch 3) in the same stitch that the ch 3 is coming out of, sk 2 dc, sl st. (See photo above.)


 Flip over and work the next row on top of the row you just made. Work with the right side (outside of the hat) facing you.
Ear flap row 2: ch 3, (working to the right) sk 2 dc, sl st, 
(working to the left now) 2 dc in every 1 dc (16 stitches total counting ch 3), sk 2, sl st. 
Fasten off and thread the extra yarn into the hat. (See photo above)

For ear flap 2 rep Ear flap row 1 and 2, starting on the 10th stitch from the "seam" on the opposite side of the hat. (See top photo above.) 
The "seam" should end up being on the back of the hat.
To make the ties cut 2 long strands of yarn. These should be three times longer than the length you want the finished ties to be.
Fold a strand in half and loop hook in the center fold of strand.
In the middle stitch of the ear flap (see bottom photo above) and pull strand of yarn though stitch. 
ch as many chain stitches it takes to run out of yarn. (Or as many ch stitches it takes to tie a bow under the chin of the person it is made for.) Fasten off and Trim excess.  
Do it again on the other flap.

 You hat should now look like the photo below.
Yippee You're done!!Put it on your little one to keep their little ears and cheeks warm and cozy.
 (Or just to see how cute they look in it.)  :)
If you want you can change it up a bit you can add pom poms or tassels to the ends of the ties.  Or you could change the color of yarn every row to make stripes. The possibilities are endless.
Happy crocheting everyone!!!
EDIT: I noticed that I forgot some details in the ear flaps. If you needed some clarifications there just read the red text.  I just added it. :) hope that helps.

Tuesday, February 8, 2011

Tutorial: pocket valentines


I was at Michaels with my sister a few weeks ago.
(Something I don't usually get to do so that was awesome! :) :) Thanks for coming to Logan to play with me Annie Carie!)
While we were there we found some cute scrapbook paper that looked like stamps.
You can't beat 25 cents so I figured I could cut each one out and make them into valentines. They ended up being pretty small so I revisited a past project and made pocket valentines again! 
The idea is to make the tiny valentine be bigger, and cuter, by sewing a heart pocket to a piece of card-stock for the tiny card to fit into.
  1. First I cut the paper into smaller pieces with postage stamp scissors.
  2. Then I used spray adhesive to attach book paper to the card-stock for a vintage look ( If you want simplicity you don't have to do this part.)
  3. Then I cut the card-stock into 4x5 in pieces. (I didn't actually measure so I'm not sure the exact size.)
  4. After that I cut out a bunch of hearts from pink paper. (Regular weight, not card-stock.)
  5. Then I laid the heart onto the card-stock piece, sandwiched the tiny valentine in-between the two (but peeking out a bit), and sewed a straight stitch around the valentine to make the pocket the right size. (Another way to do this is to trace the outline of the tiny valentine onto the heart, and follow the lines on with your sewing machine. Erase all pencil marks when you're finished.)
 You're done! Aren't they adorable?!! Kids will want to take it out of the pocket and put it back in over and over! Enjoy!


(This post in linked up in these link parties! )

Tuesday, January 25, 2011

Tutorial : How to make a window in your origami box

Remember when I figured out how to cut a hole in the top of my origami boxes? Ever since then I have been wanting to make a video. Well I finally did!

I have a tripod now so the video isn't as wobbly as my other video so thats nice. I don't teach how to make the box itself in this video so to learn how to make the box go here. I made some as gift boxes for Christmas presents for my nieces. I put little recycled Rosette hair clips inside them. It was because of the window that they turned out so adorable I think! I am so excited to share this with you all! Lets get onto the video!


Saturday, January 22, 2011

Tutorial : Candy filled valentine doily


I have had this idea in my head for a long time now and I am so excited to share it with you!  Seriously, can you get any cuter than valentine doilies laced up and filled with candy? Adding a heart window flap just magnifies the cuteness!  Plus the lacing part is super easy and fun for kids to do.
 
Materials
  • red card stock
  • hole punch
  • large scallop scissors
  • yarn
  • candy
  • cellophane (or recycled plastic bag)
  • x-acto knife
  • tape

1.  The first thing you need to do is make two doilies. (See my doily tutorial here... Also, instead of punching two rows of holes I only did one).

2.  Next you need to cut a little heart window out of one of the doilies. I made a heart template and traced it in the middle. following the tracing lines, I cut only half the heart with an x-acto knife. (This part is not intended for kids.). Then I folded it over to make a cute little flap that finishes the other half of the heart shape. (Remember to erase any pencil marks when finished.)
 
3.  Now you need to put plastic in the window. (You can use cellophane but I just cut out a piece of plastic from an old bag I had on hand.) Tape the plastic to the back of the doily to cover the hole.

4.  Grab some yarn, lace it up three fourths of the way, and fill with candy. Finish lacing and tie a pretty bow at the top.
Ta-da you're done!
Enjoy your sweet little valentines!

{I am linking up at these link parties}

Sunday, January 9, 2011

My daughters craft blog { and a free blog background }

My 6 year old daughter has a craft blog now!
She had been asking me to take pictures of all her crafts and creations for a while now. She even asked me to take photos of her making things "so other kids can learn how to make them too".  She kept telling me not to put it on my blog but on her blog since they were her crafts. But her blogs name and URL had nothing to do with crafting. So I made her a new one! It's called One creative kid.
I designed the header, the background, and other icons myself. I played a lot with bright and vibrant colors, something I don't really do on my blog. It was so much fun!  My daughter asked me to put humming birds on the header so she gets credit for that. It would have been so boring without those. Here is the image to make your own gingham blog background. And who doesn't LOVE gingham right?
(Right click image to save)
 Here is how to put it onto a Blogger blog.
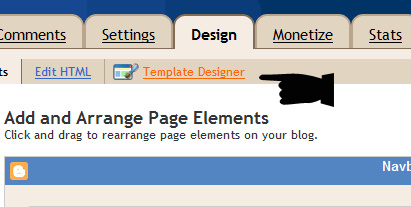
First you go to the Design tab in blogger and click "Template Designer".


Now click "Background"

Click the arrow or "remove image" to open the menu.

Next click "upload Image".


Click "Browse" and choose the image you want.


After loading your image, click "Tile" to view the menu.

Click "Tile" in the menu.

And last click "APPLY TO BLOG"
 You're done!
 Now go take a look at your awesome blog!
 Here are some more free blog backgrounds, they're smaller, and in different colors and angles. You can use these for desktop wallpaper too!  Happy gingham blogging everyone!
(Right click images to save.)